
If you’ve ever stood at the edge of your apiary in spring wondering how to grow your colonies without splashing out on queens or full nucs, the humble two-frame nuc might just become your best ally. Simple, scalable and low-cost, this method – popularised by Roger Patterson and detailed on the Dave Cushman website – is a clever way to increase colony numbers while sharpening your observational skills.
So what exactly is a two-frame nuc, and how does it work?
What is a Two-Frame Nuc?
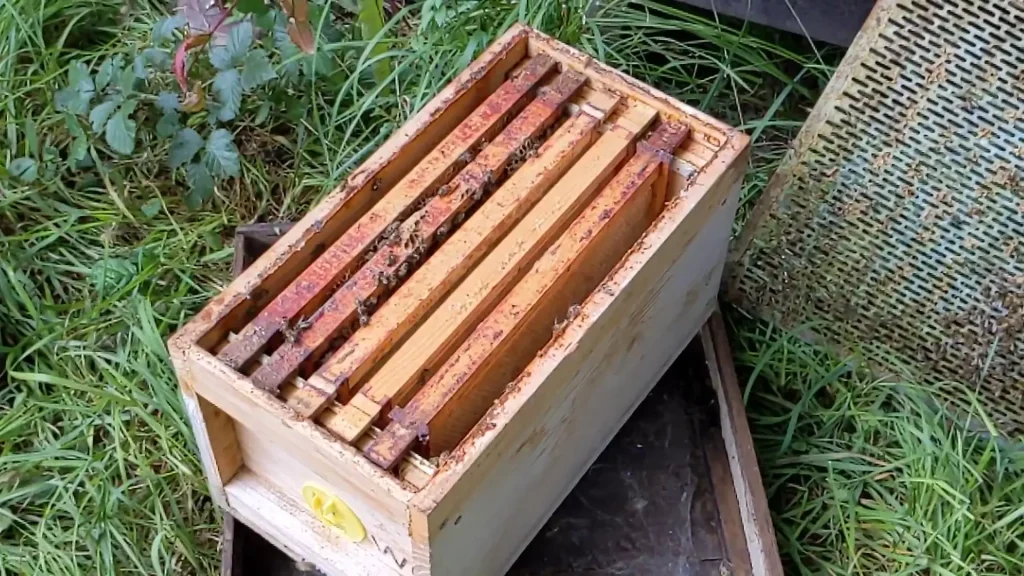
At its core, a two-frame nuc consists of:
- One frame of sealed brood, well-covered in bees.
- One frame of food, ideally pollen and nectar/honey.
- Three frames of drawn comb, if available, to complete the five-frame nuc box.
This micro-colony can be made up from a donor hive and either kept in the same apiary (with a trick to retain flying bees) or moved three miles away to avoid them drifting back.
The Queen Conundrum
You can either:
- Introduce a protected queen cell after a few hours (or the next day), or
- Allow the nuc to raise its own queen if eggs are present (less common in this method).
Avoid placing a mated queen in straight away. There usually aren’t enough bees to support her laying across all five frames, and the balance of the colony can be compromised. A newly emerged queen will typically take five days to mature and another three (weather-permitting) to mate. Within 12–15 days, you may have a laying queen ready to go.
The Growth Explosion
Don’t be fooled by the small beginnings. That one frame of sealed brood can produce three frames of bees. As the queen begins to lay, the colony expands rapidly. Within eight to ten days of emergence, fresh brood begins to appear. That little nuc starts behaving like a full colony before you know it.
You might check in one weekend and everything seems tidy. Return the next weekend and the bees are spilling out the front, with swarm cells already in play. That’s why this method isn’t just about making increase – it’s about timing, observation, and responsive beekeeping.
Ten Weeks Later: The Results
Two colonies, each made up from two-frame nucs at the end of May, were inspected in early August. Here’s what was found:
- Colony 1: Strong and productive. Three frames of solid brood, bees working the outer frames, and good stores. The queen was laying well. This colony is set to overwinter successfully, and all for the cost of one brood frame and one food frame.
- Colony 2: A different story. The original queen had been superseded, with a virgin queen noted just five days before inspection. While no eggs were yet visible, there was promising brood laid before the changeover, and signs the bees were adjusting well. Once this new queen mates, the colony should be good to go for winter.
Top Tips for Two-Frame Success
- Use drawn comb if you have it: This gives the queen somewhere to lay immediately after mating.
- Observe bee behaviour: Patterns in brood/food placement and activity tell you a lot about colony health.
- Balance your splits: Watch how returning foragers behave if two new nucs are set up side by side.
- Leave them alone post-setup: Don’t fuss. Let the queen emerge, mate, and get laying.
- Mark your queens: A visible queen helps you monitor succession, laying patterns, and swarming risk.
Why It Matters
Whether you’re a hobbyist building numbers, a teaching apiary looking to supply members, or a commercial beekeeper boosting stock – this method offers a low-cost, low-risk strategy for sustainable increase. In fact, following Patterson’s full method, it’s possible to produce ten overwintered colonies from a single strong hive over the season.
With minimal inputs and a bit of lateral thinking, you can turn one colony into many. And all for the price of one frame of brood.
Step-by-Step Instructions
1. Prepare Your Nuc Box
Set up a clean 5-frame nuc box ready to receive frames. If available, add 2–3 frames of drawn comb to help the bees build quickly once established.
2. Choose a Strong Donor Colony
Select a healthy, productive colony with plenty of sealed brood and good stores. Avoid weak or diseased colonies.
3. Collect One Frame of Sealed Brood
- Choose a frame with plenty of sealed brood, ideally well-covered in young bees.
- Leave the queen behind in the donor colony! Identify her first if possible.
- Shake off excess bees if needed, or add extra bees to compensate for light coverage.
- Check the brood for signs of disease (AFB/EFB) before transferring.
4. Collect One Frame of Food
- Choose a frame with nectar/honey and pollen.
- This will feed the bees until the colony establishes.
- Place this frame at one end of the nuc box.
5. Place Frames in the Nuc
- First, insert the food frame against the wall of the nuc box.
- Next, add the brood frame.
- Add 2–3 frames of drawn comb to complete the nuc.
- You can optionally shake extra bees into the nuc to boost numbers.
6. Decide Where to Place the Nuc
Option A: Keep it in the same apiary
- Place the new nuc in the spot of an existing colony you’ve moved elsewhere.
- This allows flying bees to return to the new nuc, boosting its numbers.
Option B: Move it to a new location (3+ miles away)
- This avoids drifting and helps the bees settle.
- Ideal if you have a second site or are working with a club or partner.
7. Add a Queen Cell
- After 4–24 hours, introduce a queen cell (protected or unprotected).
- Do not add a mated queen – there are not enough bees to support her initially.
- Leave the nuc alone for 7–10 days to let the queen emerge, mature, and (hopefully) mate.
8. Monitor Progress (at the Right Time!)
- Wait around 12–15 days before checking for a laying queen.
- Look for eggs and young brood – don’t inspect too soon or you may disrupt the mating flight.